Yoga can help strengthen and stabilize your core muscles, increase flexibility in your hip and spine, and reduce lower back pain and sciatica. While yoga can be complex and difficult to perform, here are 4 easy and effective yoga stretches that you can do at home using a yoga mat .
1. Knees-to-chest pose
The knees-to-chest posehelps stretch out the muscles in your lower back and your piriformis, a pear-shaped muscle
located deep in the buttock.
- To get started, lie flat on your back with your legs straight, the back of your knees touching the ground and inhale.
- While exhaling, bend your knees and gently bring your thighs to your chest.
- Hug your arms around your knees. Your back should be flat against the ground.
- Hold this pose for 30 seconds to one minute, taking slow, deep breaths.
- While exhaling, gently release your legs back to their original position on the ground.
Repeat this process 5 times or as you are comfortable..
Modification of the knee-to-chest pose
A modification of this pose is the single knee-to-chest pose, where only one knee is bent at a time and lifted to the chest, while the other leg is straight. The process should be repeated alternately with both legs.
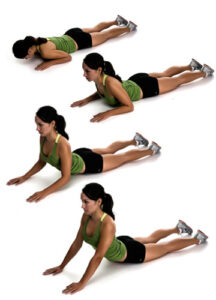
2. Cobra pose
The cobra pose will work your core and stretch your lower back.
- Lie flat on your stomach with your legs straight.
- Place your palms on the ground next to you, about level with the bottom of your ribcage. Tuck your elbows in close to your sides.
- While inhaling, push through your arms, lifting your chest off the ground.
- Your back should be arched, but your hips and lower body should be pressed against the ground.
- Hold this pose for 10 to 20 seconds, taking in slow, deep breaths.
- Gently lower your torso back to the ground.
Repeat this process 2 to 3 times as you are comfortable.
Modification of the cobra pose
If the standard cobra pose is too challenging, bend your elbow and place your forearms on the ground instead of your palms while you push your chest off the ground. Keep your elbows directly under your shoulders
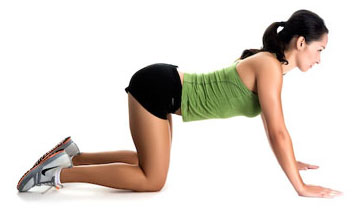
3. Cat-cow pose
The cat-cow pose (also called the cat-dog pose) improves the forward and backward bending of the lower back, improving your spinal flexibility, posture, and balance
- Get down on all fours with knees and hands on the floor. The back and neck should be in a neutral, straight position.
- Inhale and slowly tighten your lower abdomen, rounding your back towards the ceiling.
- Hold this position for 5 seconds.
- Exhale and release, returning to the neutral position.
- Inhale and arch your lower back slightly, pointing your tailbone out

- Hold this position for 5 seconds.
- Exhale and release, returning to the neutral position
4. Bridge pose
The bridge pose helps strengthen your lower back and thighs.
- Lie on your back with both knees bent and feet flat on the floor.
- Keep your arms straight down to your sides with palms to the floor.
- Inhale and slowly raise your hips into the air. Attempt to achieve a position that allows a straight line to be established from your knees through your hips to your shoulders.
- Hold this position for 5 seconds.
- Exhale and slowly lower your hips back to the ground.


